Home > Other Works > Resources & Sample Lessons > Ano-ano ang Nakikita?

RESOURCES

Ano-ano ang Nakikita? | What Do You See?

FROM THE READ AND SING SERIES

The following are supplementary music activities that build upon those presented in the book published in December 2025. To maximize the learning experience, it is presumed that you already have a copy of the book. These activities are intended for facilitators and learners with more developed musical experience. Facilitators are encouraged to select activities that best align with their strengths and their learners’ needs. Ultimately, these resources aim to make music learning joyful, adaptable, and accessible to everyone.

Sample Concepts that may be learned from the song:

  • Beat
  • Rhythm 
  • Rhythms that may be learned from the song: 
  • 4/4-time signature
  • Diatonic major scale
  • Tonic (I) and Dominant (V) chords

Sample Concepts, Skills to Be Developed, and Suggested Activities:

  • IN-TUNE SINGING
    • Students sing the song with words relatively in tune.
    • Chain Singing: Students take turns singing. At the teacher’s signal, each new singer picks up and continues where the last left off until the song ends.
    • Sing alone, with partners, or with a group.
    • Sing with or without accompaniment
  • A. PART- WORK This skill is the ability to perform more than one musical task at once.
    • Sing the words while conducting in 4/4.
    • Sing the words while conducting and walking the beat, bending one knee on the strong beats.
  • B. HARMONY WORK
    • Sing the song and find out which chords—tonic (I or D) or dominant (V or A)—are used in the piece.
    • Assign one group to sing the lyrics while the rest of the students sing the chord roots, following the teacher’s hand signs—‘do’ for the tonic and ‘so’ for the dominant.
    • The Curwen hand signs were first developed by John Spencer Curwen (1816–1880) in England and later adapted by Zoltán Kodály (1882–1967) in Hungary. These gestures accompany the solfège syllables—do, re, mi, and so on—and provide visual and kinesthetic support that helps learners internalize pitch as it moves up and down in music.
  • NOTE READING 

Students refer to the music notation of the song found in the book.

    • Clap and say the rhythm syllables. (Refer to Figure 1)
      • RHYTHM SYLLABLES are created sounds or words that represent rhythmic values, helping learners feel, read, and perform rhythms more accurately. These syllables are simply a learning tool. Different systems may exist, but what matters is using one system consistently in the early stages of children’s rhythmic development to build understanding and fluency.
      • Suggested rhythm syllables for the specific rhythms of the song: These are suggested examples only. You may create your own rhythm syllables to suit your students’ preferences and learning contexts. (FIGURE 1)
Rhythm Rhythm Syllable Rhythm Rhythm Syllable

ta

taa (one sound lasting 2 beats)

ti-ti

no sound for 2 beats

  or Z

no sound for 1 beat

tam ti

(rest) ti

      • The song has two sharps (F♯ and C♯) and ends on D as do; therefore, it is in the key of D major.
    • Identify the toneset of the song
      • TONE SET refers to the specific pitches used in the melody—ti, do, re, mi, fa, so, and la.
    • Read and sing in solfège.
      • SOLFEGE is a system of syllables (do, re, mi, etc.) used to represent the notes of a scale. The French term solfege is also known as sol-fa in English or solfeggio in Italian.
    • Read and sing in letter names.
      • LETTER NAMES are the note names (A, B, C, etc.) used in the song.
    • Sing the song in different keys using letter names.

Use the table below as a guide for the pronunciation of sharped and flatted letter names. (FIGURE 2)

Flat Letter Sharp Flat Letter Sharp
As
A
Ais
Es
E
Eis
Bes
B
Bis
Fes
F
Fis
Ces
C
Cis
Ges
G
Gis
Des
D
Dis
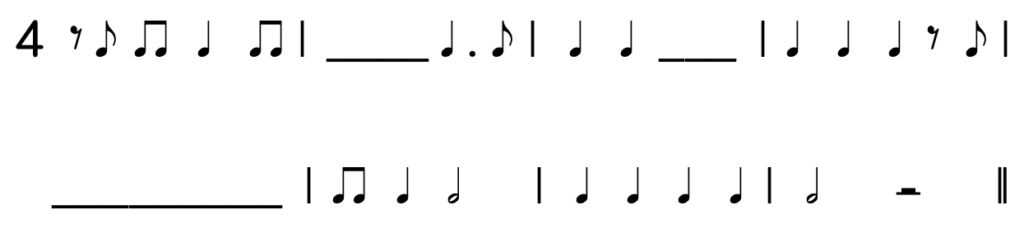
  • NOTE WRITING / EAR TRAINING
    • Sing the first verse of the song.
    • Sing the song and clap the rhythm.
    • Write the missing rhythms of the song on the blanks.

  • MOVEMENT: Assign body percussion for each rhythm.

    Sing the song with rhythm names and assign a body percussion for each rhythm. (Refer to Figure 3 for examples.) 

Stomp

Clap with arms extended forward for the first beat, then sweep one hand along the arm towards the chest for the second beat.

Tap lap

no sound for 2 beats

  or Z

Open arms with no sound for 1 beat

Clap

Open arm with no sound on the rest and click on

  • IMPROVISATION: This is the ability to create rhythms, melodies, texts, and movements within set parameters, which forms the basis for composing music.
    • Improvise a 4-8 beat rhythmic ostinato using the rhythms learned in class and use it to accompany the singing.
      • RHYTHMIC OSTINATO is a short rhythmic pattern that is repeated over and over in the same way throughout a song or section of music. 
      • For example: Clapping  “ta ta ti-ti ta” over and over while a song is sung would be a rhythmic ostinato.
    • Students think of what they usually see when they go to school and create new lyrics to replace the words of the song.
    • Play the accompaniment without the melody and invite students to improvise and sing their own lyrics and melodies.
  • INNER HEARING: The capacity to mentally hear, remember, and internally perform rhythms and melodies without physically singing or playing them.
    • Sing rhythm names inside the head and just perform the assigned body percussion for each rhythm.
    • Sing specified rhythms inside the head while continuing the body percussion. For the rest of the rhythms, sing the rhythm syllables aloud with the body percussion.
      (Example: Sing all ‘tas’ inside the head while performing the body percussion; sing the other rhythms aloud while performing the body percussion.)
    • Sing specified solfege inside the head and just show hand sign.
    • Sing specified letter names inside the head and sing the rest aloud.
  • INSTRUMENTAL PLAYING
    • Sing words and play rhythmic ostinato on percussion instruments. 
    • Students sing and accompany themselves on the guitar or ukulele applying their knowledge of tonic (I) and dominant (V) chords.
  • LISTENING
    • Students sing the song.
    • Teacher plays the American version of the song: What Shall We Do When We All Go Out?
    • Students listen
      • Do you recognize the song?
      • In what ways is the American version similar to Ano-ano ang Nakikita?
      • In what ways are they different?
    • Lead a discussion on the similarities and differences between the two songs, focusing on melody, rhythm, and text.
    • Additional discussion: Why do you think the same melody appears in different cultures?